QA agent guide
The Codex QA agent: close the QA loop - generate, curate, run
Turn OpenAI's Codex CLI into a QA tester that drives a real browser through your curated TestCollab test plan and reports pass, fail, and skip results back automatically.
TL;DR
- The Codex QA agent does two things: it writes test cases (generating them from your code or specs) and it runs human-curated test plans against your app in a real browser. A human curates in between.
- Writing runs through the TestCollab MCP server, which gives Codex 17 tools to author cases, suites, and plans directly in your workspace.
- Running uses the same loop every TestCollab agent uses:
tc getTestPlanpulls the plan as JSON, Codex drives a browser viaplaywright-cli, thentc reportuploads JUnit XML results. - You install a small TestCollab QA skill once into Codex's user-global skills directory (
~/.codex/skills/), then launch Codex from your own app's project folder. - One gotcha for running: Codex's default sandbox blocks the listening socket
playwright-clineeds to launch a browser. Run with--full-autoso the browser can start.
QA leads, SDETs, QA engineers, and developers who want OpenAI Codex to both draft test cases and execute curated plans against their app instead of clicking through every case by hand. You do not need to write any browser automation code. You do need Codex CLI installed, plus either the MCP server (to write) or a curated test plan (to run).
What is the Codex QA agent?
The Codex QA agent has two co-equal capabilities. It can write test cases - generating structured cases, suites, and plans from your code or specs - and it can run a curated test plan against your app in a real browser, with a human curating in between. Codex is OpenAI's CLI coding agent: it runs in your terminal, has full shell access, and supports a skill system that teaches it repeatable workflows. The Codex QA agent is not a separate product: it is Codex plus the TestCollab MCP server (for writing) plus the TestCollab QA skill and a browser driver, playwright-cli (for running).
The word agent matters here, and it is worth being precise about it. When the agent runs a plan, it executes a test plan that humans have already designed. It opens your app in a real browser, follows the steps written in each test case, checks the expected results, and records whether each case passed or failed. What it does not do is decide what is worth testing. That judgment, the test strategy, the coverage choices, and the release call, stays with your QA team. The agent is the hands, not the brain.
Generation and execution are the two halves of one loop, and they get conflated constantly. Generation is when an LLM reads your requirements or code and proposes new test cases for you to review. Execution is when an agent takes test cases that already exist and runs them. The TestCollab MCP server covers generation; the tc CLI covers execution. Codex does both, and this guide walks through each act in turn: write in Part 1, run in Part 2, with a human curating between them.
- Writes and runs
- Codex can generate test cases from your code or specs, and it can execute the cases in a curated plan. Humans still pick what goes into the plan and what the expected results are.
- Executes, does not decide
- When running a plan, Codex runs the cases your team curated. The agent never invents test coverage on its own during execution.
- Shell and skill driven
- Codex has full shell access and loads skills from
~/.codex/skills/. The TestCollab QA skill teaches it the fullgetTestPlanto browser toreportcycle. - Real browser, not mocks
- Codex drives an actual browser through
playwright-cli, interacting with your live UI the way a user would, rather than asserting against fixtures or stubs. - OpenAI models
- The reasoning is powered by OpenAI models through your Codex subscription. Strong instruction-following is what makes a model good at QA execution.
- Agent-agnostic contract
- The
tc getTestPlanandtc reportpair is the contract. Codex is one agent that satisfies it; Hermes Agent and Claude Code are two others.
With TestCollab: the cases Codex writes land in your workspace ready to curate, and the plan it runs comes straight out of that same workspace with results landing back on the same test plan. For the full hands-on walkthrough across all three agents, see AI in software testing: how QA agents run your test plans.
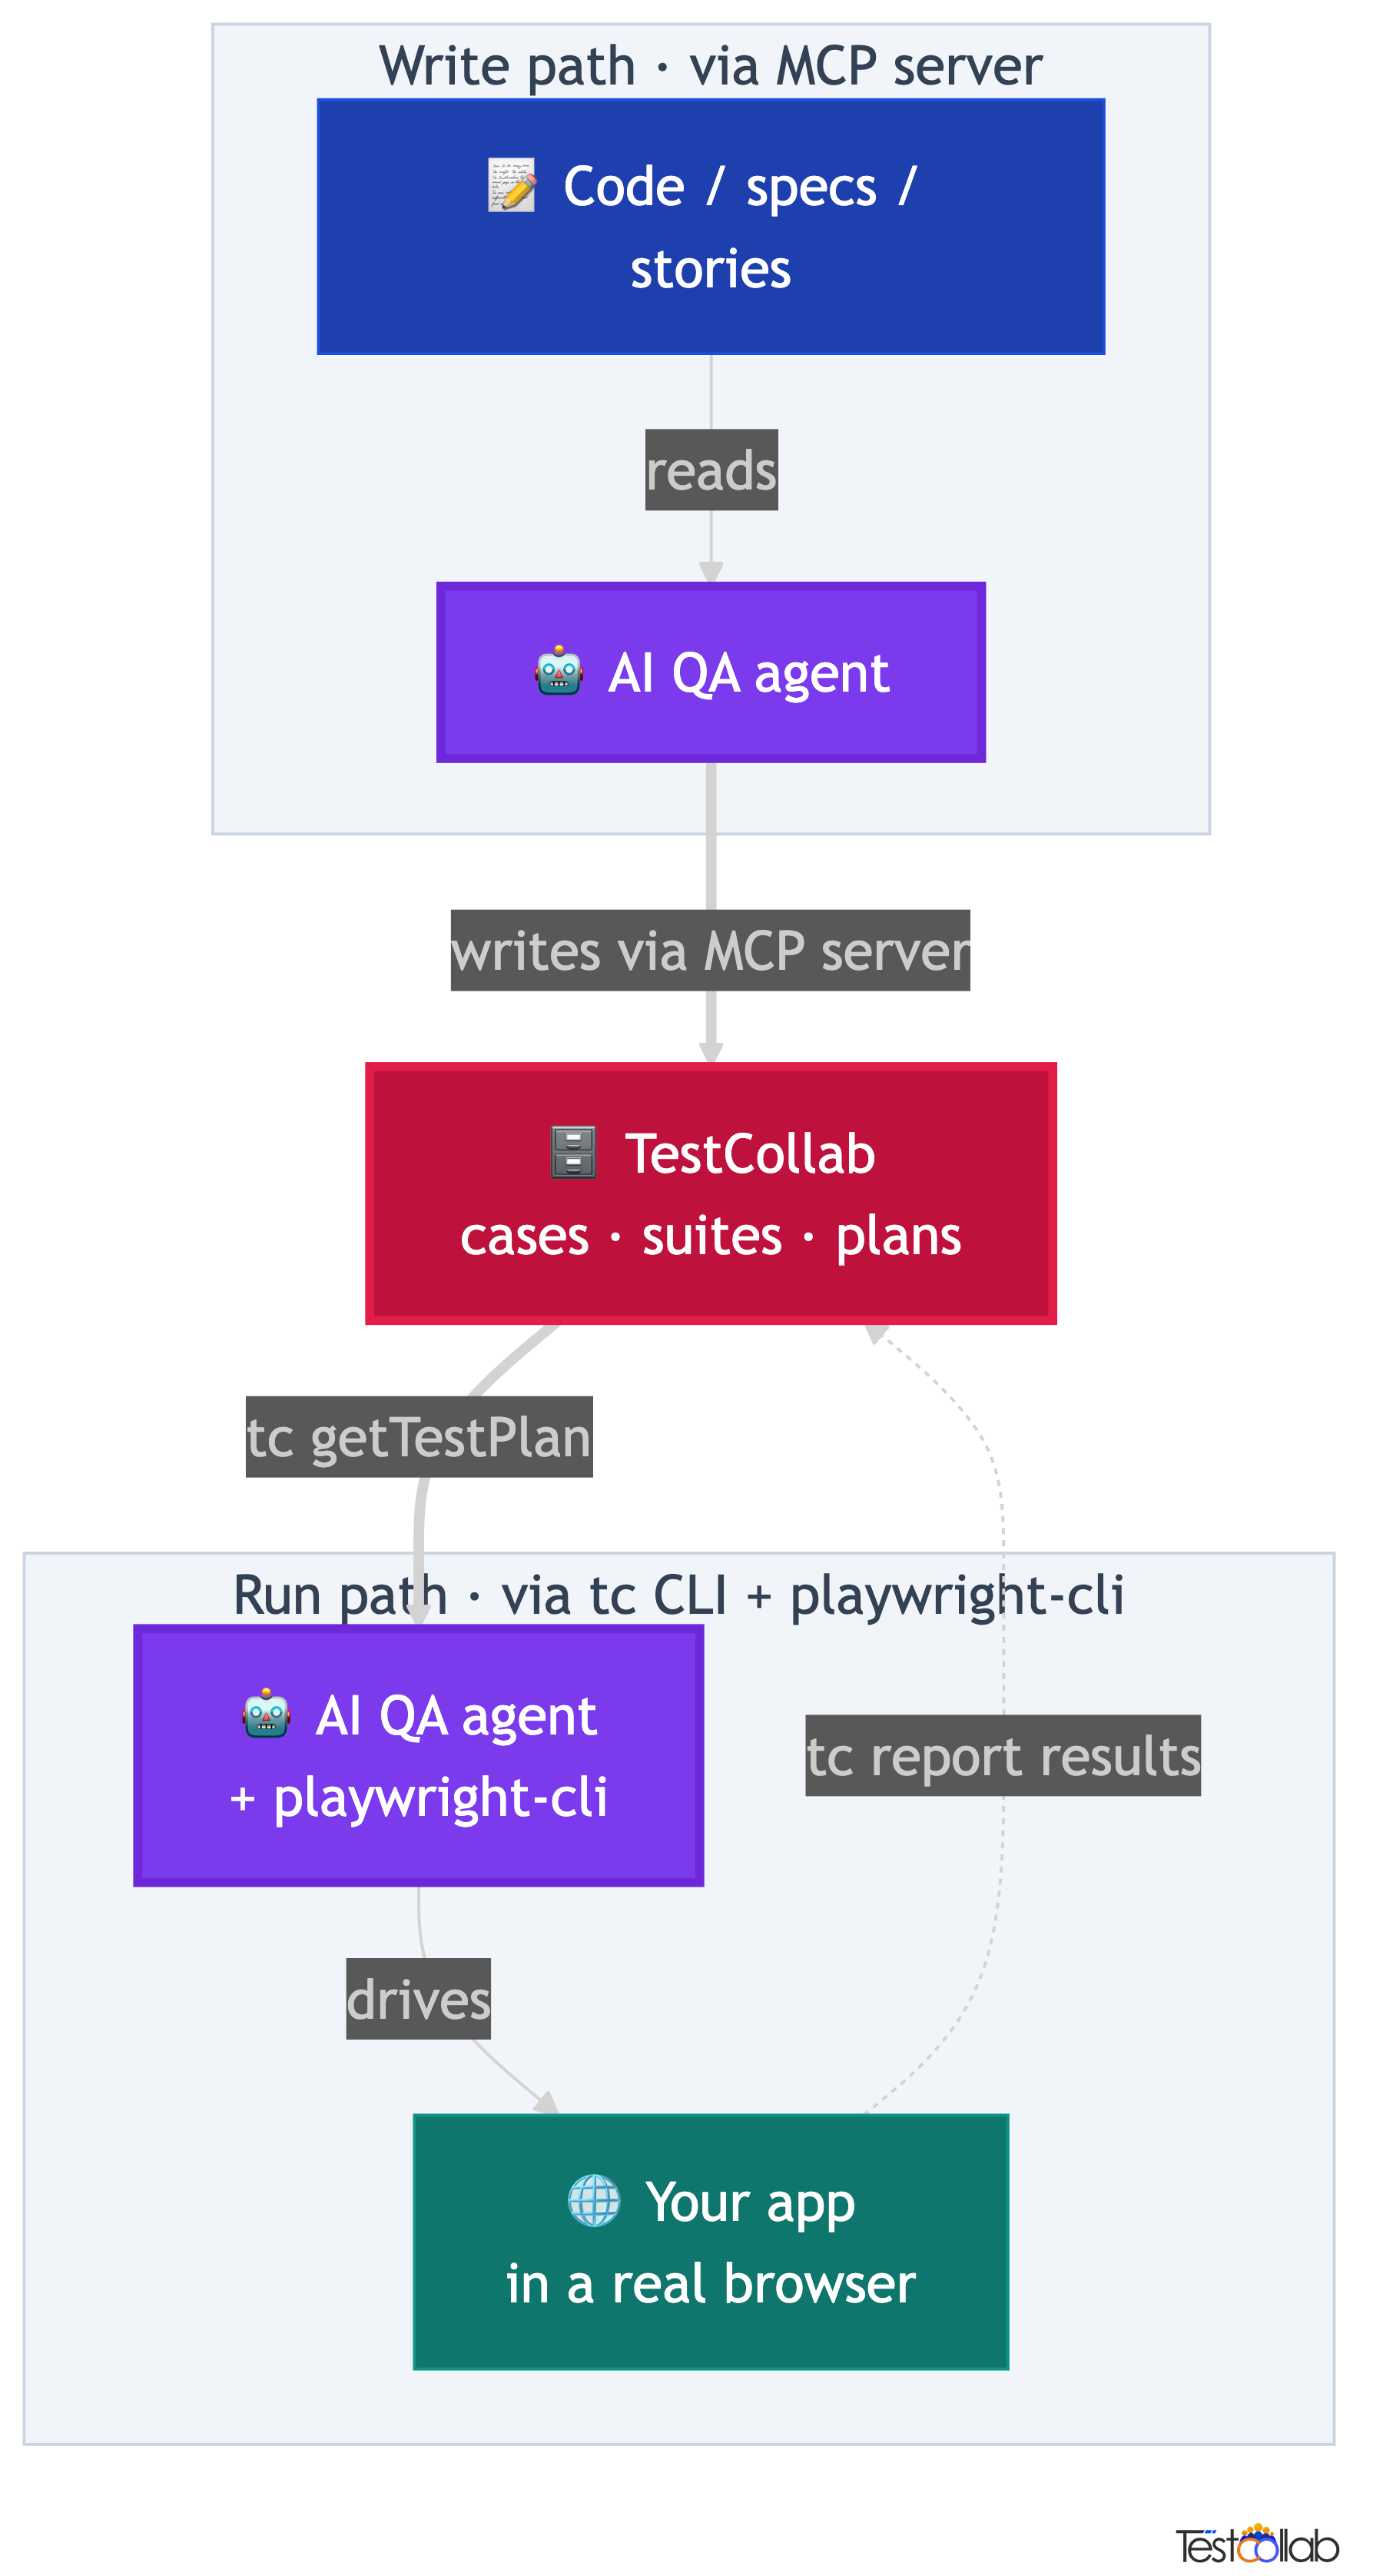
How Codex closes the QA loop: write, curate, run, report
The full QA loop is a cycle: the agent writes cases, a human curates them into a plan, the same agent runs the plan, and the results report back to TestCollab. Understanding the cycle matters more than memorizing any single command, because each step hands off cleanly to the next. Codex can slot into both the write step and the run step, with the human owning the curation in the middle.
Humans own the curation step and the last decision. Your QA team reviews the AI-drafted cases, decides which to run, sets what each step does, and defines what a passing result looks like. From there the CLI exports the plan as structured JSON, Codex executes it in a browser, and the CLI uploads the results. You stay in control of what gets tested; the agent handles the tedious parts, which are drafting cases at volume and clicking through every expected result.
Because the contract between TestCollab and the agent is small, the run half of the loop is genuinely agent-agnostic. Any agent that can run tc getTestPlan, drive a browser, and run tc report can plug into the run step. That is why the same plan runs unchanged on Codex, Claude Code, or Hermes Agent: only the thing driving the browser changes.
The full QA loop
- Write: Codex reads your code, specs, or user stories and generates test cases, suites, and plans directly in TestCollab through the MCP server.
- Curate: your QA team reviews the AI-drafted cases, refines steps and expected results, organizes them into suites, and assembles a test plan.
- Run:
tc getTestPlanexports the curated plan as JSON, Codex executes each case in a real browser viaplaywright-cli, and records pass, fail, or skip. - Report:
tc reportuploads the JUnit XML results back to TestCollab, where they appear against the original test cases and feed the next cycle.
Depending on what you need today, you can start with either half of the loop. The two cards below fork into the two acts of this guide so you can self-select.
Set up Codex for TestCollab
Both halves of the loop share a small set of base prerequisites. Get these in place once and you are ready to wire up whichever capability you need. The wiring that is specific to each act - the MCP server for writing, the tc CLI and QA skill for running - lives in its own section below.
Shared base prerequisites
- - Create a TestCollab account if you do not have one.
- - Generate a TestCollab API token from Profile then API Token.
- - Note your project ID in TestCollab.
- - Install and authenticate Codex CLI itself.
After the base setup, each capability needs its own connection. To have Codex write cases, connect the TestCollab MCP server (see Part 1). To have Codex run plans, install the tc CLI and the TestCollab QA skill (see Part 2). You only need to wire up the half you plan to use, and you can add the other half later.
Part 1: Write test cases with Codex
This is the generation half of the loop: Codex reads your code, specs, or user stories and creates structured test cases, suites, and even test plans directly in TestCollab. Generation runs through the TestCollab MCP server today, which exposes tools for test cases, suites, and plans over the Model Context Protocol. Connect it once and Codex can author cases in your workspace the same way it drives a browser: through natural language.
From code to cases
Point Codex at a feature or module. It reads the implementation, identifies happy paths, edge cases, and error handling, then creates test cases with steps and expected results, organized into suites.
From specs to scenarios
No code access needed for generation either. Give Codex a user story, requirement, or API spec and it drafts cases covering success paths, failure modes, and corner cases for you to review and keep.
Close the loop
Generate cases, curate them into a plan, then execute that plan with the same agent using the tc getTestPlan loop in Part 2. One agent covers both halves of QA.
Connect the MCP server so Codex can write cases
To have Codex author cases, register the TestCollab MCP server with it once. Codex supports MCP servers through its config.toml: add a testcollab entry and restart Codex so it discovers the tools. A write-only reader needs nothing from Part 2 to do this.
Connect the TestCollab MCP server
- Get your API token from TestCollab: Profile then API Token. Note your project ID as well.
- Register the TestCollab MCP server with Codex using the config below.
- Restart Codex so it discovers the server's tools.
- Prompt it in natural language, for example: "Generate test cases for the checkout module and add them to project 16."
Codex supports MCP servers through its config.toml. Add a testcollab entry and restart Codex so it discovers the tools.
[mcp_servers.testcollab]
command = "npx"
args = ["-y", "@testcollab/mcp-server"]
env = { TC_API_TOKEN = "your-api-token", TC_API_URL = "https://api.testcollab.io", TC_DEFAULT_PROJECT = "your-project-id" }Today, test-case generation runs through the MCP server, while the tc CLI handles execution (tc getTestPlan and tc report). CLI-driven generation is coming soon, so you will be able to script case creation the same way you already script runs. Until then: MCP server for generating, CLI for executing.
Codex supports MCP servers natively, so once the testcollab entry is in config.toml and you restart, the generation tools are available. For a deeper look at AI-driven test authoring, see our guide to AI test case generation with the MCP server.
Generate test cases, suites, and plans with Codex
With the MCP server connected, generation is driven entirely through natural language. You describe what you want covered - a module, a user story, an API spec - and Codex reads the source, reasons about coverage, and authors cases. The MCP server exposes 17 tools spanning test cases, suites, and test plans, so Codex does not just draft loose cases: it organizes them into suites and can assemble a plan in the same pass.
When you point Codex at a feature, it identifies happy paths, edge cases, and error handling, then writes each case with concrete steps and expected results. When you give it a spec instead of code, it drafts cases covering success paths, failure modes, and corner cases. Either way the output lands directly in your TestCollab workspace, under the project you named, ready for a human to curate. Nothing is published as a final plan without your review: generation produces drafts, and curation turns those drafts into something you would actually run.
Generate test cases for the checkout module and add them to project 16.The cases, suites, and plans Codex creates appear in your workspace immediately, mapped to the project you specified, where the curation step in the next section turns generated drafts into a runnable plan.
Curate generated cases into a test plan
Curation is the human step that turns WRITE output into RUN input. The agent can draft cases at volume, but a person decides which of them are worth running and what good looks like.
Generation gives you drafts; curation gives you a plan worth executing. This is where your QA judgment lives: you read what Codex produced, sharpen it, and shape it into something the run half can consume. Do this once and the same plan can run on any agent, unchanged.
Turn drafts into a runnable plan
- - Review the AI-drafted cases for accuracy, relevance, and duplicates.
- - Refine steps and expected results so each case has something concrete to verify.
- - Organize cases into suites that reflect how your team thinks about coverage.
- - Assemble a test plan from the suites and cases you want to run.
- - Note the plan ID and project ID here, because Part 2 consumes them when it runs the plan.
Part 2: Run and report with Codex
This is the execution half of the loop: Codex takes a human-curated plan and drives a real browser through it. Where Part 1 was about authoring, this act is about taking what your team curated and running every case against your live app, then reporting the results back.
The contract between TestCollab and the agent is just two CLI commands, and the loop is identical no matter which agent you run. Codex slots into the execution step of it. The plan comes out of TestCollab as JSON, Codex executes it in a browser, and the results go back up. State the contract once and the rest is mechanics: tc getTestPlan to fetch, browser to execute, tc report to upload.
The four-step QA agent loop
- Humans curate the test plan in TestCollab: the cases to run, the steps for each, and the expected result for every step.
tc getTestPlanexports that plan as structured JSON that Codex can read and work through case by case.- Codex opens a real browser with
playwright-cli, executes each test case step by step, and records pass, fail, or skip for each one. tc reportuploads the JUnit XML results back to TestCollab, where they appear against the original test cases.
The tc getTestPlan plus tc report pattern is the contract, and it is deliberately small so any browser-capable agent can satisfy it. Codex is one such agent; the TestCollab CLI guide covers the commands in depth.
Install the tc CLI and QA skill so Codex can run plans
Setup for running is a one-time job. You install the TestCollab CLI, set your token, and drop the TestCollab QA skill into Codex's user-global skills directory. After that you forget about it: every future run starts from your own project folder and the skill loads automatically. A run-only reader needs nothing from Part 1.
The key idea is that the skill installs once at the user level, not per project. Codex reads skills from $CODEX_HOME/skills/, which defaults to ~/.codex/skills/. Installing the skill there makes it available from every directory on your machine, so you never have to reinstall it for each app you test.
- Codex CLI installed and authenticated.
playwright-cliavailable on yourPATHso Codex can launch a real browser.- A TestCollab API token from Account Settings, API Tokens in TestCollab.
- A curated test plan in TestCollab, plus its project ID and test plan ID.
npm install -g @testcollab/cli
tc --versionexport TESTCOLLAB_TOKEN=your-token-herecurl -fsSL https://raw.githubusercontent.com/TCSoftInc/testcollab-cli/main/codex-skill/testcollab-qa/scripts/install.sh | bashls ~/.codex/skills/testcollab-qa/The install script drops the skill at ~/.codex/skills/testcollab-qa/ with a SKILL.md describing the workflow. Codex loads skills from $CODEX_HOME/skills/, which defaults to that path. After installing, restart Codex so it picks up the new skill, and make sure TESTCOLLAB_TOKEN is exported in your shell profile so it persists across sessions.
Codex drives the browser through playwright-cli, which you put on your PATH above, so once the CLI and skill are in place the agent has everything it needs to launch a real browser and run a plan.
Run a test plan with Codex
This is where most people trip up, so it is worth stating plainly: you launch Codex from your own app's project directory, not from testcollab-cli. The CLI is a global tool you installed earlier; you never cd into its repo to run QA. You work where you would normally work to test the app by hand.
Once you are in your project, start Codex and describe the run in plain English. Give it the test plan ID, the project ID, the URL to test against, and the login credentials. The TestCollab QA skill matches your prompt by its description and takes over from there: it fetches the plan, drives the browser, and reports back. You are not writing a script, you are briefing a tester.
cd ~/your-app
codex --full-autoExecute test plan 555 in project 16 against http://localhost:3000.
Login: testuser@example.com / password123.What Codex does after you prompt it
- Matches your prompt to the
testcollab-qaskill through the skill's description. - Runs
tc getTestPlanto fetch the plan as structured JSON. - Launches a browser via
playwright-cliand navigates to your app. - Works through each test case: navigating, clicking, filling forms, and checking the expected result for every step.
- Generates a JUnit XML result file with
[TC-ID]prefixes so results map to the right cases. - Uploads results with
tc reportand prints a pass, fail, skip summary.
Codex's default sandbox blocks new listening sockets, which is exactly what playwright-cli needs to launch a browser. If the browser fails to start, run Codex with --full-auto (or the equivalent escalation flag for your Codex version) so the browser process can open its socket. Once your QA runs are working, tighten the sandbox back down for everything else.
For CI or scripted runs, skip the interactive session entirely and pass the prompt inline with codex exec. The same --full-auto consideration applies so the browser can launch.
codex exec "Execute test plan 555 in project 16 against http://staging.example.com. Login: testuser@example.com / password123."How Codex drives a real browser
Codex does not poke at your page by scraping pixels or guessing CSS selectors. It drives the browser through playwright-cli using the accessibility tree: a text-based representation of what is actually on the page, with reference IDs for every interactive element. The agent snapshots the page, finds the element it needs by its accessible label or text, and acts on it by reference.
The practical payoff is resilience. Because the agent locates elements by their accessible role and text rather than by brittle CSS class names or DOM positions, your runs survive restyles, re-renders, and minor markup tweaks that would shatter a hard-coded selector. When a test case says to verify a success message, Codex checks the accessibility tree for that text rather than asserting against a fragile node path. If the expected result is not there, the case is marked failed with a note describing what was expected versus what was found.
| Test step | What Codex does |
|---|---|
| Navigate to /settings | Drives the browser to the full URL and waits for the page to settle |
| Click the Save button | Snapshots the page, finds the Save button by its accessible text, clicks it by reference ID |
| Enter admin@example.com in the email field | Snapshots the page, finds the email input by label, fills it with the value |
| Verify the success message appears | Snapshots the page and checks the accessibility tree for the expected text |
| The page title should be Dashboard | Snapshots and verifies the heading element contains Dashboard |
This accessibility-tree approach is the same one Claude Code and Hermes Agent use, which is why a plan that runs on one agent runs unchanged on the others. The playwright-cli skill is what makes this both resilient and token efficient compared to screenshot-based browser tools.
Results back in TestCollab
Codex generates its results as JUnit XML, the standard format CI systems already understand, with one convention that makes the round trip work: every test case name is prefixed with its TestCollab ID in square brackets, like [TC-42]. That prefix is how tc report matches each result to the correct test case in your workspace. Without it, the report would create brand new cases instead of updating the ones your team curated.
Once tc report uploads the XML, the results appear in the test plan's Test Cases tab, each case showing a color-coded status. Passed is green, Failed is red, Skipped is yellow, and any case the agent did not reach stays Unexecuted in grey. Click into any case to read the full execution detail, including the failure message with expected versus actual for the cases that did not pass.
<testsuites>
  <testsuite name="Sprint 12 Regression" tests="3" failures="1">
    <testcase classname="Login" name="[TC-42] Valid login redirects to dashboard" time="4.2"/>
    <testcase classname="Login" name="[TC-43] Invalid password shows error" time="3.1">
      <failure message="Error message not found">
        Expected: Error banner visible after wrong password.
        Actual: Page reloaded without error indication.
      </failure>
    </testcase>
    <testcase classname="Settings" name="[TC-44] User can update email" time="5.8"/>
  </testsuite>
</testsuites>- Passed (green)
- Every step in the case matched its expected result. Codex found what the test plan said it should find.
- Failed (red)
- An expected result did not match. The case carries a failure message with expected versus actual so you can triage it fast.
- Skipped (yellow)
- The agent intentionally did not run the case, for example because a precondition was not met.
- Unexecuted (grey)
- The case was never reached, often because the run stopped early or the case was outside the prompted scope.
Tips for better results with Codex
Both halves of the loop are only as good as the inputs you give them. Some of these tips improve the cases Codex writes, others improve the runs Codex executes, and a couple help both. A few habits make the difference between clean output and a pile of false failures you have to sort through by hand.
- Write concrete expected results (helps writing and running). The agent needs something specific to verify. Page loads correctly is ambiguous; URL is /dashboard and a table with at least 3 rows is visible gives Codex something it can actually check, and it also raises the quality of the cases Codex generates.
- Keep plans small (running). 10 to 30 test cases per plan is the sweet spot. Larger plans risk context drift, where the agent loses track of what it is doing around case 40. Split big suites into several plans.
- Provide credentials in the prompt (running). Do not make the agent guess. Give it the login URL, email, and password upfront so it never stalls on an auth wall.
- Use staging or local, never production (running). Codex interacts with your app like a real user: it submits forms, creates records, and changes data. Point it at a staging or local environment, never live production.
- Review failures manually (running). Agents sometimes misread a slow page load as a failure or miss a subtle UI state. Treat the results as a first pass, then have a human look at the failures before filing bugs.
The agent acts on your app exactly like a real user would, including destructive actions like submitting forms and creating records. Always point Codex at a staging, QA, or local environment. Running a plan against production can mutate real customer data.
Codex vs other QA agents
Codex is one of three agents TestCollab supports, and the choice between them is mostly about which model and CLI your team already lives in. All three agents support both halves of the loop: they can write test cases through the MCP server and run curated plans through the tc CLI. The execution loop is identical across all three: the same plan JSON, the same browser approach, the same JUnit XML, the same tc report upload. Only the thing driving the browser differs.
Codex is the natural pick for teams already working in an OpenAI-powered workflow who want repo-aware QA inside it. The one thing to remember that the other two do not require is the sandbox escalation: Codex needs --full-auto so playwright-cli can open its listening socket.
| Feature | Hermes Agent | Claude Code | Codex |
|---|---|---|---|
| Write and run support | Both (MCP to write, CLI to run) | Both (MCP to write, CLI to run) | Both (MCP to write, CLI to run) |
| Browser automation | Built-in (MCP) | Built-in (playwright-cli) | Via playwright-cli (needs --full-auto) |
| Skill install location | ~/.hermes/skills/software-development/testcollab-qa/ | ~/.claude/skills/testcollab-qa/ | ~/.codex/skills/testcollab-qa/ |
| Invocation | Natural-language prompt | Natural-language prompt | Natural-language prompt |
| Non-interactive command | hermes -z "..." | claude -p "..." | codex exec "..." |
| LLM flexibility | 200+ models via OpenRouter | Claude models | OpenAI models |
| Best for | Dedicated QA agent runs | Developer-driven QA during coding | Repo-aware QA in an OpenAI workflow |
Prefer a different stack? The same workflow is documented for the other two agents in the Hermes QA agent guide and the Claude Code QA agent guide. Pick the one that matches the CLI your team already uses; the test plan and results are interchangeable.
Glossary
- QA loop
- The full cycle of QA with an agent: the agent writes test cases, a human curates them into a plan, the same agent runs the plan in a browser, and results report back to TestCollab to feed the next cycle.
- QA agent
- An AI agent that executes a human-curated test plan against an app in a real browser and reports results. It runs cases; it does not decide what to test.
- TestCollab MCP server
- The TestCollab server that exposes test cases, suites, and plans as tools over the Model Context Protocol, letting an agent like Codex generate and author test cases directly in your workspace through natural language.
- TestCollab CLI
- The
tccommand-line tool that bridges TestCollab and any agent.tc getTestPlanexports a plan as JSON;tc reportuploads JUnit XML results back. - playwright-cli / accessibility tree
- The browser driver Codex uses. It locates elements by their accessible role and text in a structured page snapshot, making runs resilient to CSS and markup changes.
- MCP (Model Context Protocol)
- An open protocol for connecting AI agents to external tools. TestCollab's MCP server is used for AI test-case generation, the write half of the QA loop.
- JUnit XML / [TC-ID]
- The standard result format the agent produces. The
[TC-42]prefix on each test case name is what letstc reportmatch a result to the correct TestCollab case. - Skill
- A small
SKILL.mdfile that teaches an agent a repeatable workflow. The TestCollab QA skill installs to~/.codex/skills/and teaches Codex the full QA loop.
Further Reading
FAQ
What is the Codex QA agent?
It is OpenAI's Codex CLI combined with the TestCollab QA skill and the playwright-cli browser driver. Together they let Codex read a curated test plan from TestCollab, execute each case against your app in a real browser, and report pass, fail, and skip results back. Codex executes the plan; it does not decide what to test, that is still your QA team's job.
Can Codex generate test cases, or only execute them?
Both. Execution and generation are two halves of the same loop. Execution uses the tc CLI (tc getTestPlan then tc report). Generation uses the TestCollab MCP server, which gives Codex 17 tools to create test cases, suites, and plans directly in your workspace from code, specs, or user stories. CLI-based generation is on the roadmap; today, connect the MCP server for generation.
Does the Codex QA agent generate test cases?
Yes. Generating new test cases from requirements or code is one of its two halves, and it runs through the TestCollab MCP server. The other half is execution: running test cases your team has already curated into a plan, through the tc CLI. Codex does both, and a human curates the generated cases into a plan in between.
Why do I need to run Codex with --full-auto?
Codex's default sandbox blocks new listening sockets for safety. The playwright-cli browser driver needs to open exactly such a socket to launch a browser, so under the default sandbox the browser fails to start. Running with --full-auto (or the equivalent escalation flag for your Codex version) lets the browser process start. Tighten the sandbox back down afterward for everything else.
Where does the TestCollab QA skill install?
Into Codex's user-global skills directory at ~/.codex/skills/testcollab-qa/, which is where Codex reads skills from ($CODEX_HOME/skills/, defaulting to that path). It installs once and is then available from every project directory. After installing, restart Codex so it picks up the new skill, and make sure TESTCOLLAB_TOKEN is set in your shell profile.
Do I launch Codex from the testcollab-cli folder?
No. You launch Codex from your own app's project directory, the same folder you would cd into to test the app by hand. The TestCollab CLI is a global tool you installed once with npm; you never cd into its repo to run QA. The user-global skill loads automatically wherever you launch Codex.
How do results map back to my TestCollab test cases?
Codex produces JUnit XML where each test case name is prefixed with its TestCollab ID, like [TC-42]. The tc report command uses that prefix to match each result to the correct existing case in your workspace. Without the prefix, the report would create new cases instead of updating the ones your team curated.
Can I run the Codex QA agent in CI?
Yes. Use codex exec "..." with the plan, project, URL, and credentials in the prompt for a non-interactive run. The same sandbox consideration applies, so make sure the run can escalate enough for playwright-cli to launch a browser. Point CI runs at a staging environment, never production, since the agent interacts with your app like a real user.
Close the QA loop with Codex
Let Codex generate the cases and run the plan while results flow straight back to your workspace. Author cases through the MCP server, curate them into a plan, and have the same agent execute it against your app.


