You've got a test plan in TestCollab. 47 test cases, each with detailed steps and expected results, curated by your QA team. Now someone needs to actually execute them against the app - clicking through pages, filling forms, verifying that the right things show up in the right places.
What if that someone was an AI agent with a browser?
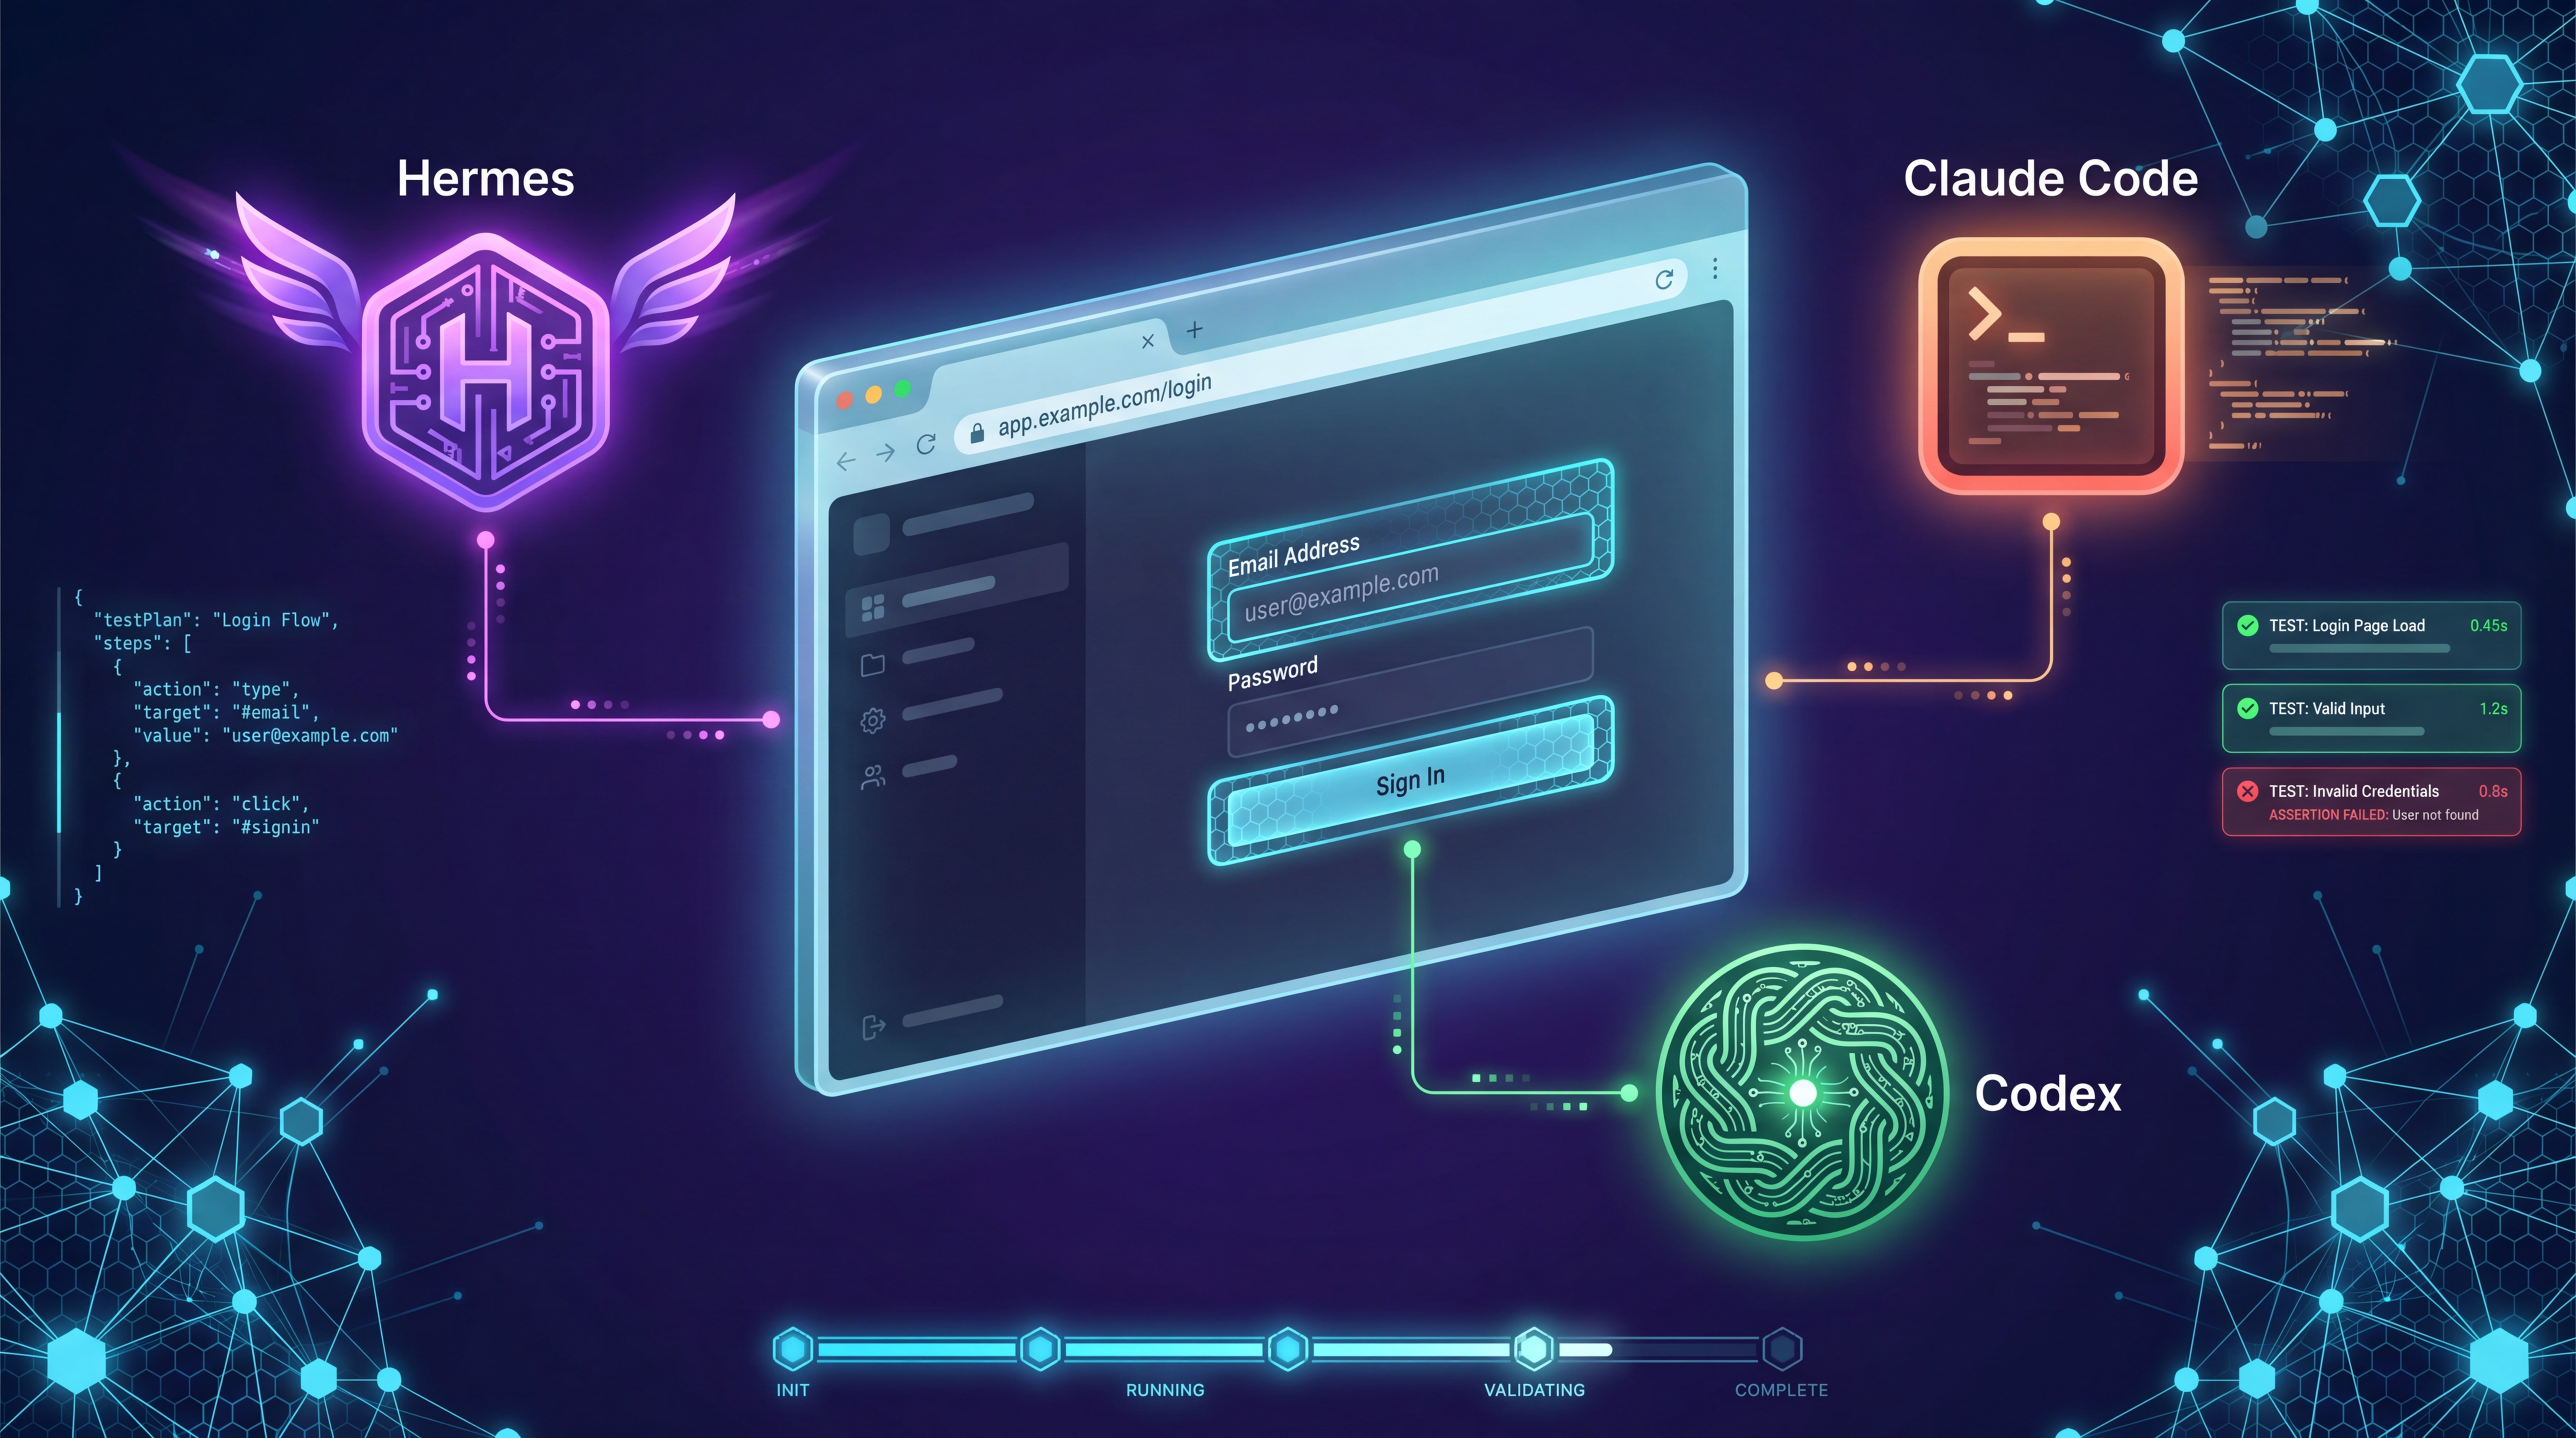
This is what AI in software testing actually looks like in 2026 - not theoretical, not "AI-powered" marketing copy. A QA agent reads your curated test plan, drives a real browser, and reports results back to your test management tool. Humans decide what to test; the agent does the clicking.
The TestCollab CLI makes this possible with any AI coding agent that can drive a browser. This tutorial covers three QA agents - Hermes Agent, Claude Code, and Codex - so you can pick the one that fits your stack.
What "AI in software testing" actually means here
AI software testing has fragmented into two distinct workflows that often get conflated:
This post is about the second workflow. The model isn't deciding what to test - that's still a human's job. It's deciding how to click through the flow being tested, which is the part hand-written E2E suites do brittlely and humans do slowly. That's the part of QA where AI agents earn their keep.
How the agentic QA workflow works
The workflow has four steps, and the CLI handles the plumbing between TestCollab and the agent:
tc getTestPlan exports the plan as structured JSON that agents can consumetc report uploads the JUnit XML results back to TestCollabHumans stay in control of what to test. The agent handles executing it. The tc getTestPlan + tc report pattern is agent-agnostic - any agent with browser access can slot into step 3.
Common setup
Every agent needs the TestCollab CLI and a test plan. Set these up first, then pick your agent below.
How the install pattern works
All three agents below follow the same shape. You install a small TestCollab skill into the agent's user-global skills directory once. After that, you launch the agent from your own project's directory: the same place you'd cd into to run tests by hand - and the skill is auto-loaded from its description when you mention the work. You never cd into testcollab-cli to run QA.
| Agent | Skill installs to | You launch from |
|---|---|---|
| Hermes | ~/.hermes/skills/software-development/testcollab-qa/ | your app's project dir |
| Claude Code | ~/.claude/skills/testcollab-qa/ | your app's project dir |
| Codex | ~/.codex/skills/testcollab-qa/ | your app's project dir |
Install the TestCollab CLI
npm install -g @testcollab/cli
tc --version
Set your TestCollab API token (get it from Account Settings → API Tokens in TestCollab):
export TESTCOLLAB_TOKEN=your-token-hereCreate a test plan in TestCollab
If you don't have one already, create a test plan in TestCollab with the test cases you want to execute. Each test case should have:
- A clear title describing what's being tested
- Steps with specific actions (e.g., "Navigate to /login", "Enter admin@example.com in the email field")
- Expected results for each step (e.g., "Dashboard is displayed", "Success toast appears")
Note your project ID and test plan ID: you'll need them when running the agent.
Option A: Hermes Agent
Hermes Agent is an open-source AI agent by Nous Research with built-in browser automation via MCP. It uses a skill system to learn workflows, and the TestCollab QA skill teaches it the full getTestPlan → browser → report cycle.
Prerequisites
- Python 3.10+
- An LLM API key (OpenRouter, Anthropic, or any provider Hermes supports)
Install Hermes Agent
curl -fsSL https://raw.githubusercontent.com/NousResearch/hermes-agent/main/scripts/install.sh | bash
source ~/.bashrc
hermes setup
Hermes supports 200+ models via OpenRouter, Anthropic, OpenAI, and other providers. Models with strong instruction-following (Claude, GPT-4, Gemini) work best for QA tasks.
Install the TestCollab QA skill (one-time, user-global)
Hermes loads skills from ~/.hermes/skills/, so installing the TestCollab QA skill there makes it available from every directory on your machine. One install, then you forget it.
curl -fsSL https://raw.githubusercontent.com/TCSoftInc/testcollab-cli/main/hermes-skill/testcollab-qa/scripts/install.sh | bashThat script copies SKILL.md into ~/.hermes/skills/software-development/testcollab-qa/. Hermes organizes skills by category - software-development is the category declared in this skill's manifest. To verify:
ls ~/.hermes/skills/software-development/testcollab-qa/Add your TestCollab token to Hermes' global env file so the skill can call the API:
echo "TESTCOLLAB_TOKEN=your-token-here" >> ~/.hermes/.envRun from your own project
Switch to the project you actually want to test - the app's repo, not testcollab-cli:
cd ~/your-app
hermes
Then prompt it:
Execute test plan 555 in project 16 against http://localhost:3000.
Login: testuser@example.com / password123.
Hermes finds the TestCollab QA skill in your user-global skills dir, fetches the plan, drives the browser, generates JUnit XML, and calls tc report.
Non-interactive mode
For CI or scripted runs, pass the prompt inline:
hermes -z "Execute test plan 555 in project 16 against http://staging.example.com. \
  Login: testuser@example.com / password123." --accept-hooks
hermes chat -q "..." works the same way if you prefer the subcommand form.
Option B: Claude Code
Claude Code is Anthropic's CLI coding agent. It has built-in browser automation via playwright-cli - the same accessibility-tree approach that Hermes uses. No separate browser agent or skill installation needed.
Prerequisites
- Claude Code installed and authenticated
- playwright-cli browser installed (Claude Code will prompt you if needed)
Install the TestCollab QA skill (one-time, user-global)
Claude Code loads skills from two locations:
~/.claude/skills/<name>/SKILL.md: user-global, available in every project<project>/.claude/skills/<name>/SKILL.md: project-local, available only in that one project
curl -fsSL https://raw.githubusercontent.com/TCSoftInc/testcollab-cli/main/claude-code-skill/testcollab-qa/scripts/install.sh | bashThe script drops SKILL.md into ~/.claude/skills/testcollab-qa/, checks that Claude Code and @testcollab/cli are installed, and warns if TESTCOLLAB_TOKEN is unset. To verify:
ls ~/.claude/skills/testcollab-qa/(If you'd rather scope the skill to one repo, drop the same SKILL.md into your-app/.claude/skills/testcollab-qa/SKILL.md instead - same skill, different visibility.)
Run from your own project
Switch to the app you want to test - not testcollab-cli:
cd ~/your-app
claude
Then prompt it:
Execute test plan 555 in project 16 against http://localhost:3000.
Login: testuser@example.com / password123.
Claude Code matches the prompt to the testcollab-qa skill via its description and:
tc getTestPlan to fetch the plan as JSONplaywright-cli[TC-ID] prefixestc reportNon-interactive mode
For CI or scripted runs:
claude -p "Execute test plan 555 in project 16 against http://staging.example.com. \
  Login: testuser@example.com / password123."
Option C: Codex
Codex is OpenAI's CLI coding agent. It has full shell access and a skill system, so once you install the TestCollab QA skill it can drive a browser via playwright-cli and run the same getTestPlan → browser → report cycle as Hermes and Claude Code.
Prerequisites
- Codex CLI installed and authenticated (
npm install -g @openai/codex) - playwright-cli available on
PATHso Codex can launch a real browser
Install the TestCollab QA skill (one-time, user-global)
Codex loads skills from $CODEX_HOME/skills/ (defaults to ~/.codex/skills/). Installing the TestCollab QA skill there makes it available from every directory on your machine - one install, then you forget it.
curl -fsSL https://raw.githubusercontent.com/TCSoftInc/testcollab-cli/main/codex-skill/testcollab-qa/scripts/install.sh | bashThat drops the skill at ~/.codex/skills/testcollab-qa/ with SKILL.md. To verify:
ls ~/.codex/skills/testcollab-qa/Restart Codex so it picks up the new skill, and make sure TESTCOLLAB_TOKEN is set in your shell profile so the skill can call the API.
Run from your own project
Switch to the project you actually want to test - not testcollab-cli:
cd ~/your-app
codex
Then prompt it:
Execute test plan 555 in project 16 against http://localhost:3000.
Login: testuser@example.com / password123.
Codex matches the prompt to the testcollab-qa skill via its description, fetches the plan with tc getTestPlan, drives the browser via playwright-cli, generates JUnit XML, and uploads results with tc report.
Non-interactive mode
For CI or scripted runs:
codex exec "Execute test plan 555 in project 16 against http://staging.example.com. \
  Login: testuser@example.com / password123."
Sandbox note: Codex's default sandbox blocks new listening sockets, which playwright-cli needs to launch a browser. Run with --full-auto (or the equivalent escalation flag for your Codex version) so the browser process can start. Tighten the sandbox back down for everything else.
How a QA agent drives a real browser
Both Hermes and Claude Code use accessibility trees: a text-based representation of what's on the page, with reference IDs for interactive elements. This makes them resilient to CSS class changes, re-renders, and minor UI tweaks.
Here's what a typical test case execution looks like:
| Test step | What the agent does |
|---|---|
| "Navigate to /settings" | Navigates the browser to the full URL |
| "Click the Save button" | Takes a page snapshot, finds the Save button by text, clicks it by reference ID |
| "Enter 'admin@example.com' in the email field" | Snapshots the page, finds the email input, fills it with the value |
| "Verify the success message appears" | Snapshots the page and checks the accessibility tree for the expected text |
| "The page title should be 'Dashboard'" | Snapshots and verifies the heading element contains "Dashboard" |
Result mapping
Results are mapped back to TestCollab test cases using the [TC-ID] convention in JUnit XML:
<testsuites>
  <testsuite name="Sprint 12 Regression" tests="3" failures="1">
    <testcase classname="Login" name="[TC-42] Valid login redirects to dashboard" time="4.2"/>
    <testcase classname="Login" name="[TC-43] Invalid password shows error" time="3.1">
      <failure message="Error message not found">
        Expected: Error banner visible after wrong password.
        Actual: Page reloaded without error indication.
      </failure>
    </testcase>
    <testcase classname="Settings" name="[TC-44] User can update email" time="5.8"/>
  </testsuite>
</testsuites>
The [TC-42] prefix is what lets tc report match each result to the correct test case in TestCollab. Without it, results would create new test cases instead of updating existing ones.
What results look like in TestCollab
After tc report uploads the JUnit XML, results appear in the test plan's Test Cases tab - each test case shows its execution result with a color-coded status:
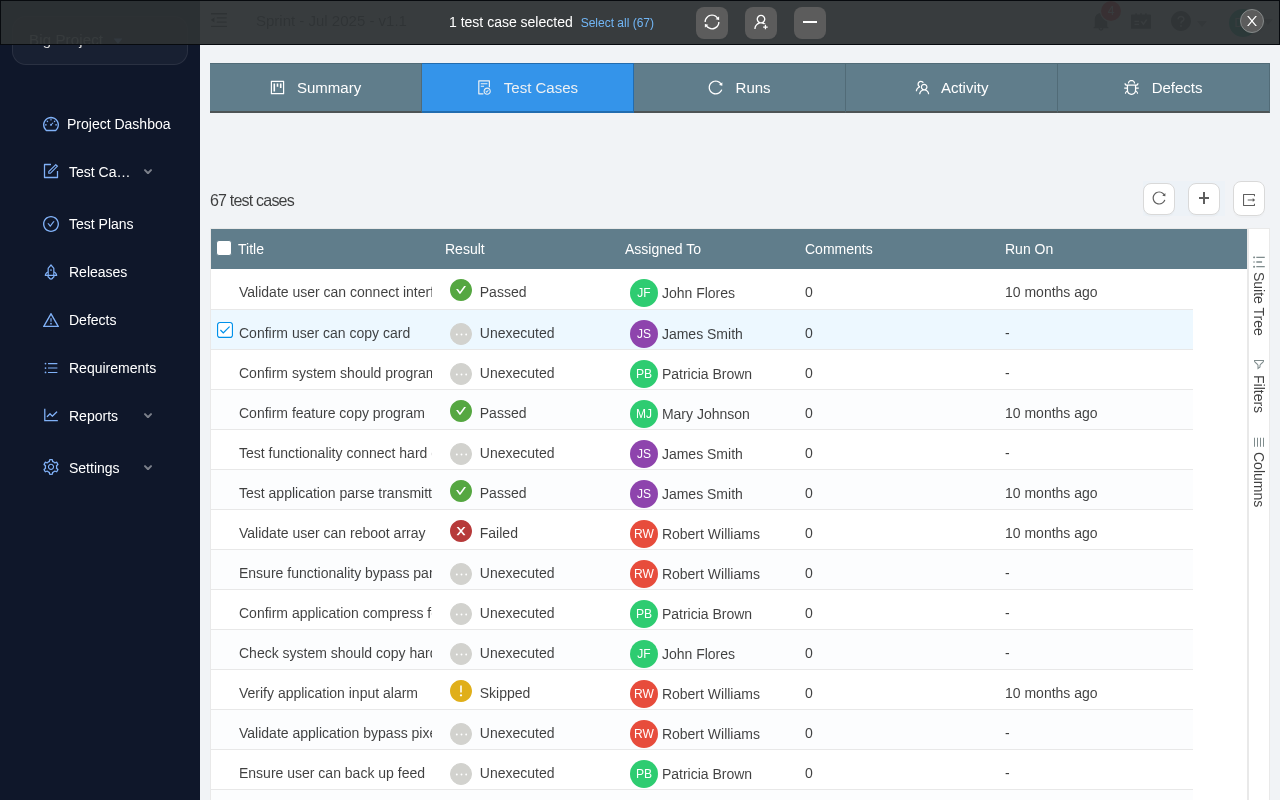
The Result column shows Passed (green), Failed (red), Skipped (yellow), and Unexecuted (grey) at a glance. Click any test case to see the full execution details, including failure messages with expected vs. actual results.
See it in action
We tested both Hermes Agent and Claude Code against the TestCollab website itself - homepage, pricing, and blog - with a 3-case smoke test plan.
Hermes Agent results
Test Plan: TestCollab Website Smoke Test
Total: 3 | Passed: 3 | Failed: 0 | Skipped: 0

TC-201 [Homepage] - PASS
  - testcollab.com loaded with title "Test Management Tool for Humans & AI Agents"
  - "TestCollab" brand name present in page content and navigation
  - "START FREE TRIAL" and "Try For Free Now" CTAs visible

TC-202 [Pricing] - PASS
  - testcollab.com/pricing loaded with title "Plans & Pricing | TestCollab"
  - Three plan tiers present: Premium, Elite, Enterprise
  - Prices visible: $29/user/month (Premium), $39/user/month (Elite)

TC-203 [Blog] - PASS
  - testcollab.com/blog loaded with title "Blog | TestCollab"
  - 12 blog posts visible on first page, each with a title
  - Every article shows both a category label and publication date
Claude Code results
Test Plan: TestCollab Website Smoke Test (Claude Code)
Total: 3 | Passed: 3 | Failed: 0 | Skipped: 0

TC-201 [Homepage] - PASS
  - Page title: "Test Management Tool for Humans & AI Agents - Test Collab"
  - "TestCollab logo" in navigation, brand name in header
  - "Start Free Trial" and "Try For Free Now" CTAs found via accessibility tree

TC-202 [Pricing] - PASS
  - Page title: "Plans & Pricing | TestCollab"
  - Three plan headings: "Premium", "Elite", "Enterprise" identified
  - "$29" and "$39" price elements visible in plan cards

TC-203 [Blog] - PASS
  - Page title: "Blog | TestCollab"
  - Multiple article elements with titles, each with category and date
  - Categories: "Announcements", "Quality Assurance", "Best Practices"
Both agents passed all 3 test cases. The same test plan JSON, the same JUnit XML format, the same tc report upload - the only difference is which agent drove the browser.
<testsuite name="TestCollab Website Smoke Test" tests="3" failures="0">
  <testcase classname="Homepage" name="[TC-201] Homepage displays brand name and signup CTA"/>
  <testcase classname="Pricing" name="[TC-202] Pricing page shows plan tiers"/>
  <testcase classname="Blog" name="[TC-203] Blog page lists recent articles"/>
</testsuite>
Tips for better results
Keep test plans small. 10–30 test cases per plan works best. Larger plans risk context drift - the agent may lose track of what it's doing around case 40. Split large suites into multiple plans.
Write concrete expected results. The agent needs something specific to check. Compare:
- Vague: "The page loads correctly"
- Concrete: "URL is /dashboard and a table with at least 3 rows is visible"
Use staging, not production. The agent interacts with your app like a real user - it can submit forms, create records, and modify data. Point it at a staging or local environment.
Review failures manually. Agents sometimes misclassify slow page loads as failures, or miss subtle UI states. Use the results as a first pass, then review failures with human eyes before filing bugs.
Choosing a QA agent
| Feature | Hermes Agent | Claude Code | Codex |
|---|---|---|---|
| Browser automation | Built-in (MCP) | Built-in (playwright-cli) | Via playwright-cli (needs --full-auto) |
| Skill install location | ~/.hermes/skills/software-development/testcollab-qa/ | ~/.claude/skills/testcollab-qa/ | ~/.codex/skills/testcollab-qa/ |
| Invocation | Natural-language prompt | Natural-language prompt | Natural-language prompt |
| Where you run it from | Your app's project dir | Your app's project dir | Your app's project dir |
| Best for | Dedicated QA agent runs | Developer-driven QA during coding | Repo-aware QA inside an OpenAI-powered workflow |
| Non-interactive/CI | hermes -z "..." | claude -p "..." | codex exec "..." |
| LLM flexibility | 200+ models via OpenRouter | Claude models | OpenAI models |
| Cost | Bring your own API key | Claude Code subscription | Codex subscription |
What's next
The skills for all three agents and their install scripts are open source in the TestCollab CLI repo under hermes-skill/, claude-code-skill/, and codex-skill/. Install each one to its agent's user-global skills directory, work from your own project, and the tc getTestPlan → agent → tc report loop is the same regardless of which agent you pick.
If you're already using the TestCollab MCP Server for AI-powered test case generation, this closes the loop: AI generates the test cases, humans curate them into plans, and an AI agent executes them.
The agentic QA workflow works with any agent that has browser automation - not just the three covered here. The tc getTestPlan + tc report pattern is the contract. See the Agentic QA Guide for the framework-agnostic approach.