
On this page
Introduction
Behavior Driven Development (BDD) helps teams describe system behavior in plain English using
Gherkin syntax. With Test Collab, you can connect your .feature files from Git
and sync them into your projects.
In this guide you'll learn how to:
-
Try the BDD Demo Project
-
Create a new BDD project from scratch
-
Sync and update
.featurefiles Fix common setup errors
Step 1: Create a Project in Test Collab
When you click Add Project, you'll see two options:
-
BDD Project
Choose this if you plan to sync.featurefiles from Git using Gherkin. -
Regular Project
Choose this if you want to manage test cases directly in the Test Collab interface.
👉 For this guide, select BDD Project.
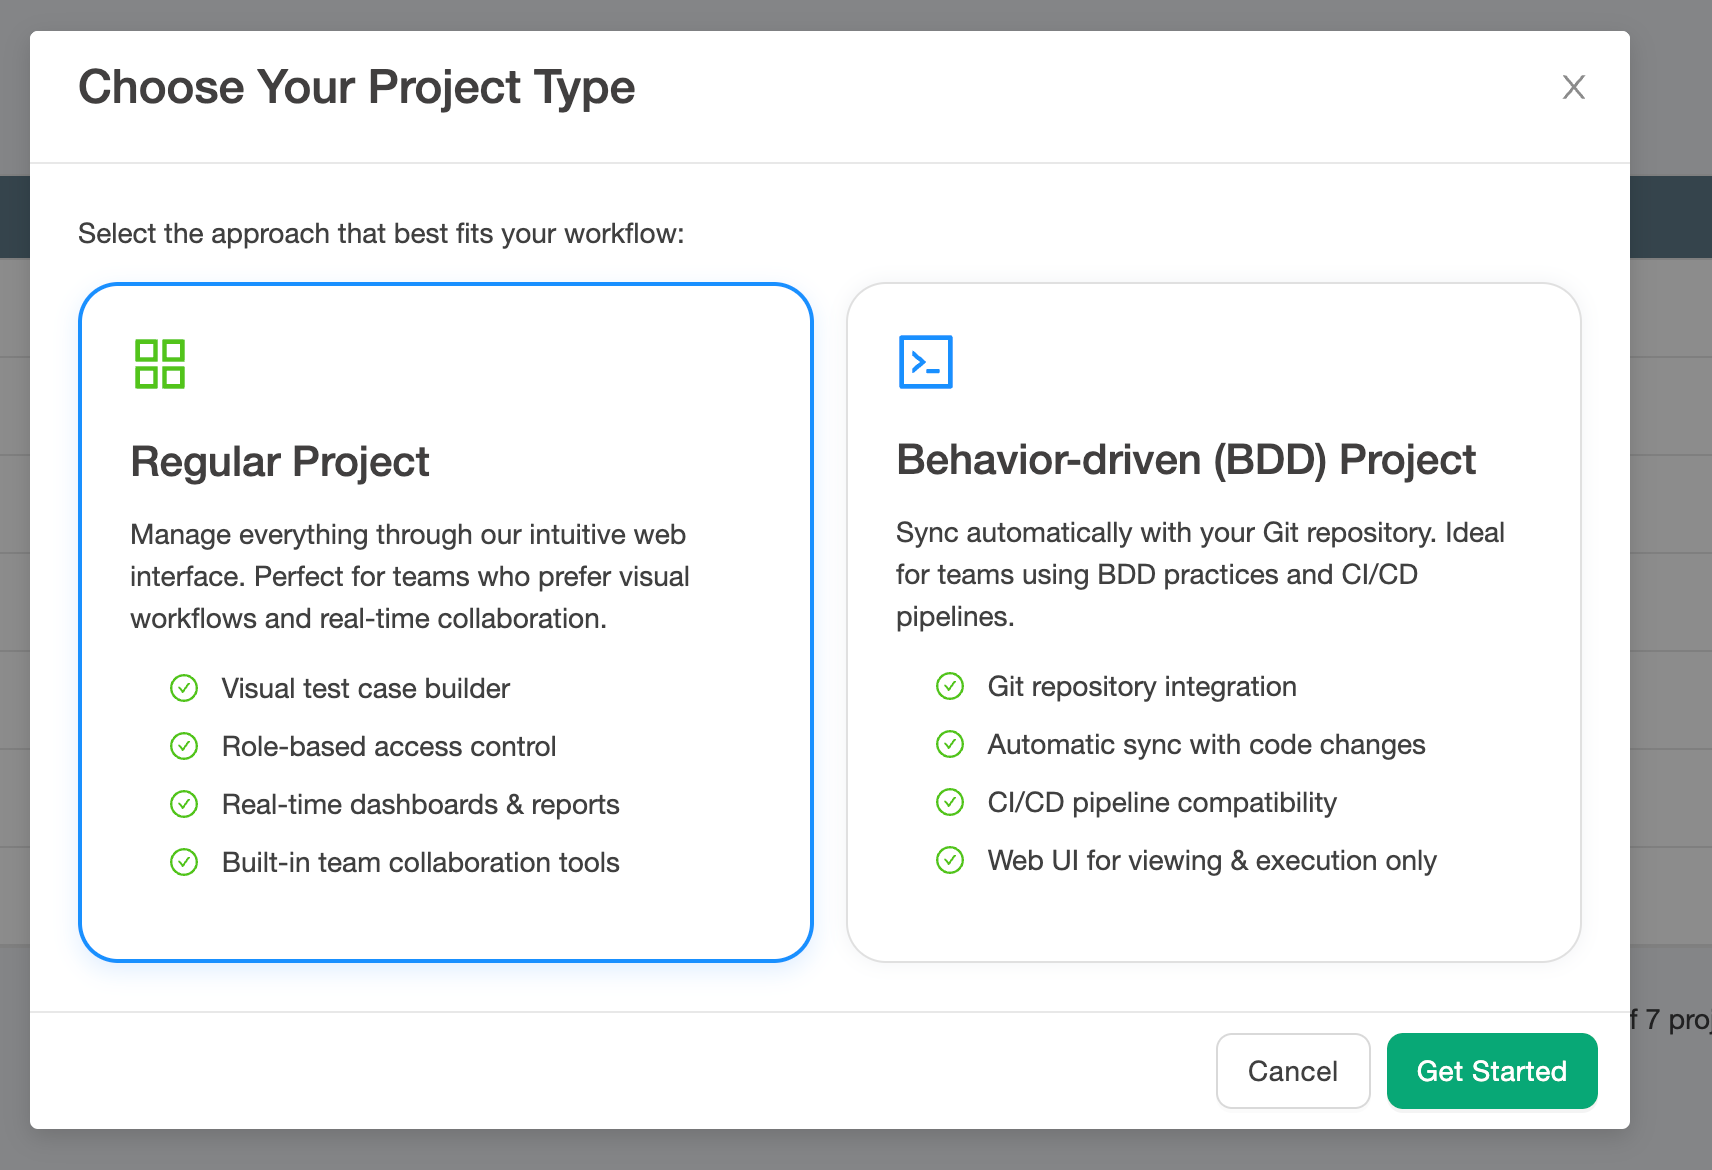
Note: This choice is mainly informational — it highlights your workflow but does not restrict
functionality.
After creating the project, note down its Project ID. You can find it in the project's URL in your browser. Example:
https://testcollab.io/project/123/manage → the ID is 123.
Step 2: Fork our BDD demo Project (Optional) (or use your own repo)
If you want to see BDD in action before setting up your own, try our BDD Demo Project on GitHub.
testcollab-bdd-demo-v2/
├── README.md                          # Quick start
├── .github/workflows/bdd.yml          # CI: sync, run Cucumber, report
├── features/
│   ├── auth/
│   │   └── user_login.feature         # Scenario Outlines, Rules, tags
│   ├── account/
│   │   └── profile_management.feature # Data table, doc string
│   ├── step_definitions/              # Cucumber steps
│   └── support/
├── scripts/                           # tc sync and tc report wrappers
└── index.html, script.js, style.css   # The demo application
The demo repo already includes:
-
A sample
features/folder with.featurefiles that use Scenario Outlines, Rules, tags, a data table and a doc string A Cucumber test suite that runs those scenarios
-
A GitHub Actions workflow that syncs the feature files, runs the tests and reports the results to the synced test cases
-
A README quick start that runs the whole flow with
npm run tc:demo
Quick start commands:
git clone https://github.com/TCSoftInc/testcollab-bdd-demo-v2.git

cd testcollab-bdd-demo-v2
If you are using your own repo, make sure 'features' directory exists along with at least one .feature file.
Step 3: Create API key + Setup
Generate an API Token
-
Go to My Profile Settings > API Token.
-
Click Generate Token and copy it.
-
Store it in your operating system or CI secret manager. Do not paste it into the repository or a shared command.
1. Setup NPM package @testcollab/cli
a) Global install
npm install -g @testcollab/cli

# verify installation
tc --help
-or-
b) Set up as dev dependency
npm install --save-dev @testcollab/cli

# verify installation
npx tc --help
Add a Feature File to your repo (skip if you already have these)
Inside features/, create login.feature:
Feature: Login

  Scenario: Successful login
    Given user is on the login page
    When user enters valid credentials
    Then user should be redirected to the dashboard
Run Initial Sync
Load TESTCOLLAB_TOKEN from your approved secret store, then run the sync command. The
token is intentionally omitted from the command so it does not end up in shell history.
tc sync --project YOUR_PROJECT_ID✅ Example output:
Sync started...
Uploading features/login.feature
Sync completed successfully. 1 feature(s) synced.
Now go to your project in Test Collab and you should see all test cases and test suites created.
Step 4: Updating and Re-syncing
-
Edit your
.featurefiles locally Save and commit with Git
Run the sync command again
Your changes will now appear in Test Collab like this:
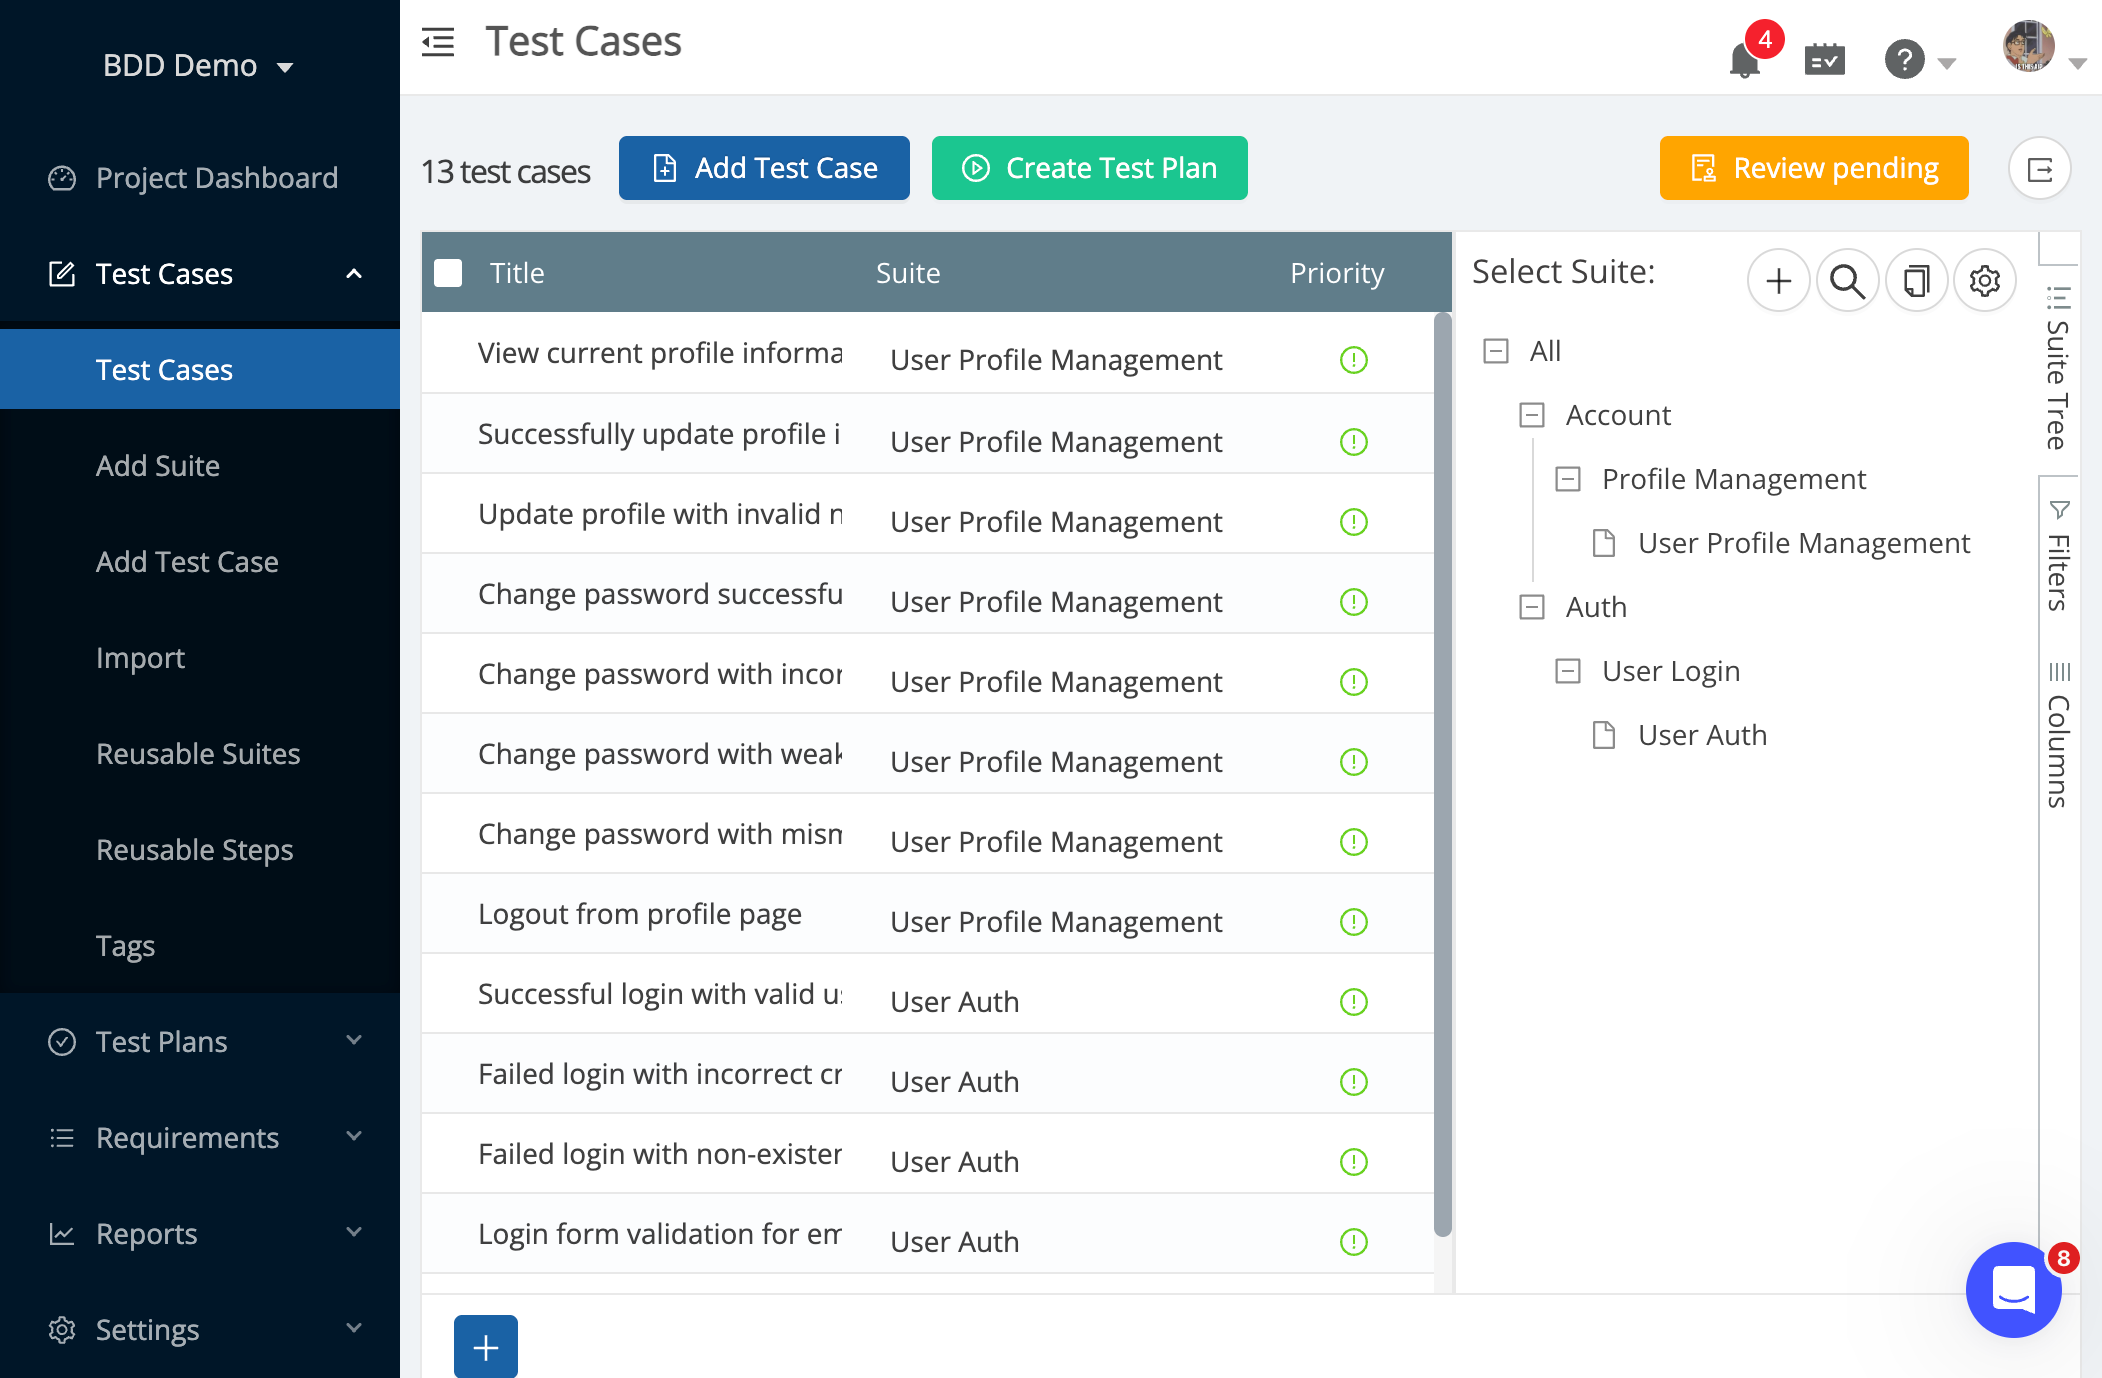
Known limitations. The sync recognises a scenario by its steps and its title inside one file. A scenario that is renamed and edited in the same commit, a file that is renamed and heavily edited in the same commit, or a scenario that moves to another file ends up as a new test case, and the old case is archived with its history. A removed scenario archives its test case instead of deleting it. See how the sync maps your feature files.
Step 5: Setup CI sync
Ideally, call sync every time a new .feature file is added or an existing one is
modified. Run the same command from your CI process:
tc sync --project YOUR_PROJECT_IDThis keeps the changes synchronized and makes your Git repository the source of truth for all scenarios.
Following snippets show how to achieve this with GitHub and GitLab
GitHub Actions
Create TESTCOLLAB_TOKEN as a secret
name: Sync Feature Files
on:
  push:
    branches: [main]
    paths: ['**/*.feature']

jobs:
  sync:
    runs-on: ubuntu-latest
    steps:
      - uses: actions/checkout@v3
        with:
          fetch-depth: 0  # Important: fetch full history

      - uses: actions/setup-node@v3
        with:
          node-version: '18'

      - run: npm install -g @testcollab/cli

      - run: tc sync --project ${{ secrets.TESTCOLLAB_PROJECT_ID }}
        env:
          TESTCOLLAB_TOKEN: ${{ secrets.TESTCOLLAB_TOKEN }}
GitLab CI
Add TESTCOLLAB_TOKEN and TESTCOLLAB_PROJECT_ID as masked, protected
CI/CD variables in GitLab.
In your .gitlab-ci.yml add following job:
sync-features:
  stage: test
  image: node:18
  before_script:
    - npm install -g @testcollab/cli
  script:
    - tc sync --project $TESTCOLLAB_PROJECT_ID
  only:
    changes:
      - "**/*.feature"
Modify 'stage' as per your workflow.
Troubleshooting
-
"Not inside Git repo" → Run
git init. -
"Missing TESTCOLLAB_TOKEN" → Export your API token before syncing.
-
API/Network issues → Check your internet connection or regenerate token.
-
400 Error codes → Permissions issues, make sure user who generated API token has all permissions required to create / edit test cases and test suites
Next Steps
Now that your BDD project is set up, you can:
-
Add more
.featurefiles for broader coverage -
Organize scenarios into suites